

If you’re serious about game streaming, you’ve probably heard of OBS Studio—the go-to software for both beginners and pros. It’s free, open-source, and packed with powerful features. But here’s the catch: if you don’t optimize OBS for high-quality streaming, your streams might end up looking choppy, pixelated, or laggy.
Don’t worry! In this post, we’ll walk you through the essential steps to fine-tune OBS for high-quality streaming so you can deliver smooth, professional content every time you go live.
Choose the Right Hardware
First things first—your PC needs to be up to the task. High-quality streaming is demanding, especially if you’re gaming and broadcasting on the same machine.

Recommended setup:
- CPU: At least a quad-core processor (Intel i5/Ryzen 5 or better)
- GPU: A dedicated graphics card like NVIDIA GTX 1660 or above
- RAM: 16GB or more
- Storage: SSD for faster loading and responsiveness
If your hardware is underpowered, even the best OBS settings won’t save you from dropped frames and stuttering.
Best OBS Settings for High-Quality Streaming
Getting OBS set up the right way can make all the difference.
- Base Resolution: 1920×1080 (or 1280×720 if you need to scale down)
- Output Resolution: Match your stream platform’s recommendations
- Bitrate:
- 1080p @ 60fps → 4500–6000 kbps
- 720p @ 60fps → 3000–4500 kbps
- Encoder:
- NVIDIA users: Select NVENC (new)
- AMD users: Choose AMF
- No GPU? Use x264, but expect a heavier CPU load
- Preset: Quality or Max Quality for the best balance
- Frame Rate: 60fps for smooth gameplay (30fps if your system struggles)
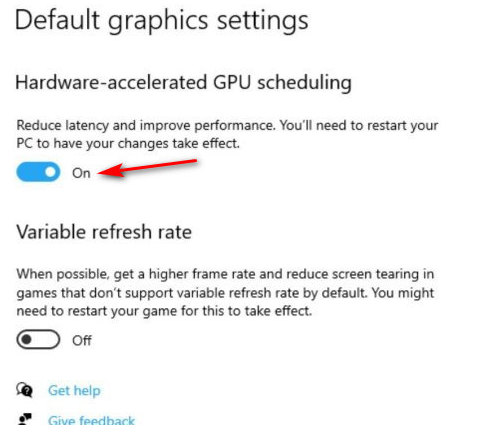
Enable Hardware Acceleration
To lighten the CPU’s load, make sure hardware acceleration is turned on where possible:
- Use GPU encoding (NVENC/AMF)
- Enable Game Mode in Windows
- Turn on Hardware-accelerated GPU scheduling in Windows Graphics settings
This helps OBS run smoother, especially during high-action scenes.
Tweak Windows & Game Settings
Your operating system and game settings can also impact stream quality:
- Set OBS to High Priority in Task Manager
- Close unnecessary apps running in the background
- Use fullscreen borderless windowed mode in your games
- Lower in-game graphics slightly to free up resources for OBS
Sometimes small adjustments make a big difference in stream stability.
Use Scene Optimization
Want smoother streams? Keep your OBS scenes clean and efficient. Avoid overloading them with too many sources, and stick to lightweight image formats like .jpg or .png to reduce resource usage. Limit browser sources and flashy animated overlays, as they can drag down performance. Also, make sure to preload media files to prevent any awkward stutters during your stream. Think of it like tidying up before guests arrive—OBS runs best in a clutter-free environment.
Test Your Internet Connection
You could have a NASA-level PC and still end up with a choppy stream if your internet connection isn’t up to par. For smooth 1080p streaming, you’ll need at least 6 Mbps of upload speed, and it’s always best to use a wired Ethernet connection since Wi-Fi can be unpredictable. Before going live, run a quick speed test to check your stability. If your upload speed fluctuates, don’t hesitate to lower your bitrate or resolution—there’s absolutely no shame in streaming at 720p if it means a buffer-free experience for your viewers.
Monitor Performance in Real-Time
Keep one eye on your stream stats like a hawk.
- OBS has a handy Stats panel—check it under View > Stats
- Look out for dropped frames, high CPU usage, and rendering lag
- Use Task Manager to keep tabs on your system
If things get sketchy, don’t panic—just lower a few settings and test again.
Record Test Streams Before Going Live
This is your secret weapon. Always run a test stream!
- Record a short 2–3 minute gameplay session
- Watch it back to check audio sync, quality, and smoothness
- Adjust your OBS settings as needed before you hit that “Go Live” button
Better safe than sorry—nobody wants to realize their mic wasn’t working halfway through a two-hour stream.
Wrapping It Up
Getting OBS dialed in can feel overwhelming at first, but once you’ve got everything optimized, you’re golden. With the right gear, smart settings, and a little prep work, your streams will look fantastic and run like a dream.
So go on—set up, hit record, and show the world what you’ve got. Just don’t forget to keep a water bottle handy (hydration = OP).
Catch you on stream!
What’s your biggest streaming struggle? Let me know in the comments


